Assalamualaikum dan salam 1 Malaysia
Hari ini, kita akan belajar buat Tutorial reply button pada Komen
Owkey, ikut step ini saje.
Langkah 1
Dashboard > Design > Edit HTML > Tick kotak "Expand Widget Templates"
Dashboard > Design > Edit HTML > Tick kotak "Expand Widget Templates"
Langkah 2
Dengan menggunakan ctrl + F (tekan serentak pada keyboard), cari kod
Kemudian copy kod di bawah, dan paste dibawah kod<b:include data='comment' name='commentDeleteIcon'/> tadi
Dengan menggunakan ctrl + F (tekan serentak pada keyboard), cari kod
Langkah 3<b:include data='comment' name='commentDeleteIcon'/>
Kemudian copy kod di bawah, dan paste dibawah kod<b:include data='comment' name='commentDeleteIcon'/> tadi
<span class='comment-reply'><a expr:href='"https://www.blogger.com/comment.g?blogID=ID BLOG ANDA&postID=" + data:post.id + "&isPopup=true&postBody=%40%3C%61%20%68%72%65%66%3D%22%23" + data:comment.anchorName + "%22%3E" + data:comment.author + "%3C%2F%61%3E#form"' onclick='javascript:window.open(this.href, "bloggerPopup", "toolbar=0,location=0,statusbar=1,menubar=0,scrollbars=yes,width=400,height=450"); return false;'><img alt='Reply To This Comment' src='URL BUTTON REPLY ANDA'/></a></span>
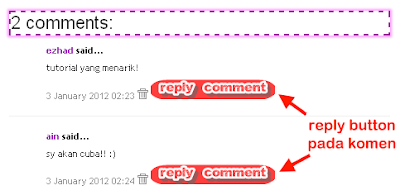
Contoh:
Langkah 4<b:include data='comment' name='commentDeleteIcon'/>
<span class='comment-reply'><a expr:href='"https://www.blogger.com/comment.g?blogID=ID BLOG ANDA&postID=" + data:post.id + "&isPopup=true&postBody=%40%3C%61%20%68%72%65%66%3D%22%23" + data:comment.anchorName + "%22%3E" + data:comment.author + "%3C%2F%61%3E#form"' onclick='javascript:window.open(this.href, "bloggerPopup", "toolbar=0,location=0,statusbar=1,menubar=0,scrollbars=yes,width=400,height=450"); return false;'><img alt='Reply To This Comment' src='URL BUTTON REPLY ANDA'/></a></span>
ID BLOG ANDA - Masukkan ID blog kamu
URL BUTTON REPLY ANDA - copy url button yang disediakan di bawah:

http://img444.imageshack.us/img444/3084/replybuttonred.png

http://img269.imageshack.us/img269/6203/replybuttonpurple.png

http://img21.imageshack.us/img21/1659/replybuttongreen.png

http://img692.imageshack.us/img692/5678/replybuttonblue.png

http://img193.imageshack.us/img193/2958/thesilvertreespritingfi.png

http://img576.imageshack.us/img576/4171/treplyb.gif

http://img841.imageshack.us/img841/5407/replybutton.jpg

http://img41.imageshack.us/img41/350/reply3l.gif

http://img864.imageshack.us/img864/8449/reply2.gif

http://img225.imageshack.us/img225/5681/replyt.gif

http://img824.imageshack.us/img824/2202/84379010.png

http://img688.imageshack.us/img688/2853/90595834.png
Langkah 3

http://img843.imageshack.us/img843/7505/80872001.png

http://img828.imageshack.us/img828/9420/87249541.png

http://img641.imageshack.us/img641/9880/68119496.png

http://img252.imageshack.us/img252/5628/buttontopicreply.gif

http://img12.imageshack.us/img12/2073/buttonpmreplyi.gif

http://img269.imageshack.us/img269/6886/animatedreply.gif


{ 1 ulasan... read them below or add one }
Assalam... waaaaaa, jadilah thanx ya tutorialnya...
11 June 2012 at 01:33
Post a Comment
Terima kasih kerana memberi komen. Sila datang kembali ya !
Kami akan cuba membalas komen anda secepat yang mungkin.